Page views

Friday, 24 January 2014

Q7) Looking back at your preliminary task, what do you feel you have learnt in the progression from it to the full product?


 For the AS media preliminary task we were asked to produce a front cover and contents page for a student magazine.

Front Cover -

 For my front cover design I planned a mind-map with possible ideas, including camera location, name of the magazine, content included and colour choice. When shooting my photo I hadn't fully prepared the shoot and therefore my image didn't comply to the 'rule of thirds,' and this is something I worked on with my final front cover design. My student magazine features an image that ties in with the context of college but the photo itself was simply uploaded to InDesign with no changes or edits made in PhotoShop. But by planning my final products photo-shoot with a suitable location I was able to select a correct image for the design, and in my case this was a close up of my models face. The photo I used for my final product complied with typical conventions seen in music magazines as the my model is making direct eye contact with an audience, however I had deviated from typical codes through the colour choice of my main image. By using photoshop I was able to apply a contrast and adjust levels to create a saturation which tied in with my colour scheme and this colour choice differs to magazine examples I had looked at, as the majority features a full coloured image, just like my student magazine.

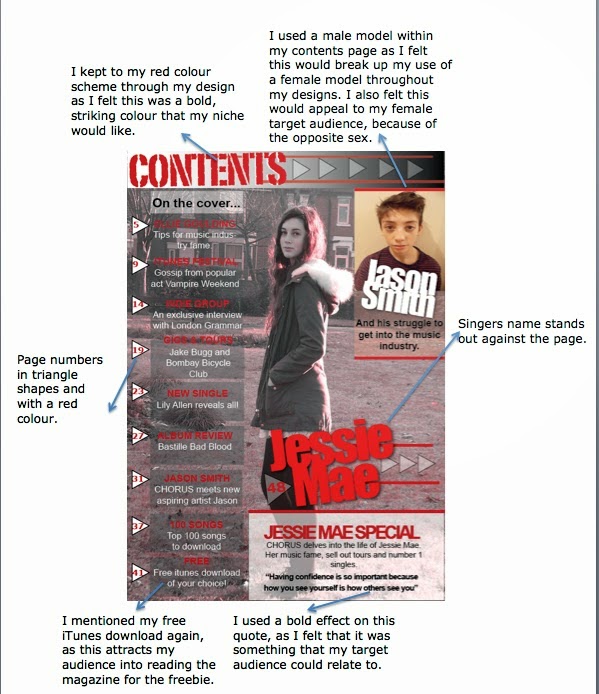
 The front cover of my student magazine is very boxed, and harsh against the page and this is an element that didn't work on the page design. By grouping text into a box, I wasn't making effective use of page space and therefore it meant my design wasn't very eye catching. For my music magazine I had developed my knowledge of page layout by analysing exemplar music magazines in the ways in which they place text around an image. And I have applied my knowledge of this to my final magazine design, by using the opacity tool to reduce the colour impact on the shape work. As well as this I had played around with font sizing to fill in spacious gaps on my design and this is something my student magazine featured a lot due to the boxed design.

The title of my student magazine, hadn't been designed effectively with the tools in indesign and this showed on the final outcome of the design. By using singular text with no effect, I hadn't made the masthead bold enough to stand out against the page and it had blended in with the rest of my design. But my final music magazines masthead has been created with a design element, by using a single red box I was able to place my font on top of this in two varied colours to create the desired contrast I had wanted. By using a white on top of a black, I was able to make a feature of my masthead which had a greater impact. Finally for my masthead i had tilted the text at a slight angle, and this subtle difference meant that the masthead was clearly recognisable. And this is something my student magazine had lacked.


Q6) What have you learnt about technologies from the process of constructing this product?

Q5) How Did You Attract/Address Your Audience?


Q4) Who would be the audience for your media product?


When designing my magazine I had an intended target audience in mind. Above I have created a slideshow with photos of young female adults who I specifically designed my product for, their age ranging from 16 - 20. I made an assumption based on stereotypes as to what my target niche will be interested in, and this I concluded to fashion and celebrity gossip. My niche would already be consuming media products such as pop magazines, and by introducing a new indie-pop magazine to the market, I will be reaching out to vast amounts of young female adults. 

My magazine designs feature content which my niche would be interested in such as exclusive interviews and top tips from musicians. My front cover sums up my magazine genre by one singular image, and this photo mimics my target audience greatly.. by incorporating a saturated red image on my front cover I was able to create a visually striking, unique design which a my indie pop genre. I used a triadic colour scheme of red,white and black; these could be associated with dark, evil colours but I think on my design they represent the type of music I am focusing on. 
In comparison to this, my contents page features two photos one of a female   and one of a male, both of these photos portray my music genre to my audience through the models looks.. 
My double page spread is the main element of my design which represents my target audience. The photo I decided to use shows the ideals I have of my audience and who I want to consume my media product. The model I used was dressed in a winter fashion, something which my niche would be highly interested in. The interview contents itself is very gossipy, an element that my niche should have a high interest in.
To conclude, I feel that my designs represent my ideal target audience as the design elements I have incorporated portray this.


Monday, 20 January 2014

Q1) In what ways does your product use, develop or challenge forms and conventions of real media products?


Front Cover

Before designing my product, I carried out an in-depth research into the music magazine industry. A main focus of my research was analysing music magazines design elements, and applying its design to my own media product. Above I have my final magazine design and example of Q and NME magazine, the image I have chosen to use meets typical codes and conventions of music magazines as I have complied to the 'rule of thirds' to meet my target audiences eyes and this is a reflection of Q and NME magazine. However my main image is of a gradient red colour which composed via layers in photoshop, when comparing this to the likes of Q and NME  I have deviated from typical conventions as both Q and NME have no filter on the design, and this is where my front cover differs. Having looked at NME and Q as my inspiration, I combined both text elements to feature on my design.  I liked the listing of cover lines on Q magazine and incorporated this onto my design, as well as making my main cover line emphasised through text sizing and a slightly transparent box. I noted that the issues of Q and NME Magazine I was mainly influenced by didn't feature a puff and plug element, but this was something I had wanted to include on my design as I felt this would reach a target audience quickly. By layering two polygon shapes onto one another, I was able to create a puff and plug which made a highly anticipated impact against my design  I have made an emphasis on my cover-lines by incorporating very slight transparent boxes, this brings out the textual element without their being a distraction from my image.


Contents-

For my contents page, I had  tried to mimic the conventions of Q magazine. I had looked at a number of contents designs and took on board the elements used to construct a meaningful contents. Having analysed the connotations of red within music magazines, I noted that it is commonly associated with a rock genre and this was something I had developed to challenge conventions by using red to convey an indie pop genre. I had really liked the layout of Mixmag, and I had took this design as a basic structure for my contents design but I have developed its layout to suit my genre of music. I have incorporated transparent boxes in my contents to reinforce a style idea that was reflected within my front cover, I also mimicked both Q and Mixmag's magazine box to the bottom right of my design but again made its transparency very slight so it worked with my other conventions.I feel as if I have challenged conventions found in contents designs, as I have added graphic elements such as the red lines and triangles to emphasise my design.


Double Page Spread-


I found creating my double page spread the most challenging out of the three designs. The double page spread required a lot of research into existing products before applying elements of design to my final piece. Initially I found the Lady Gaga double page spread very useful and based my design around the same basic layout, however I intended to use a interview style article and this was something that the Lady Gaga piece didn't have. This meant I was changing the design element to fit my double page spread. When choosing an image for my double page, I had wanted the image to be black and white as this complimented my research. However after having placed the black and white image onto my design, I felt the piece didn't fit together because it was too monotone. I then decided carried an ongoing theme of a red gradient image  through onto my double page and this uplifted the overall look of the final design. Having done this I chose to in-keep my red lines and triangles on my double page as I believe this showed consistency throughout my design. 


Tuesday, 14 January 2014

Double Page Spread Design FINAL


Double Page Spread-

I feel that my double page spread is my weakest design, as it doesn't look very striking. I found it hard working with smaller text and this was something that music magazines typically use within double page spreads, having looked at a vast majority of exemplar double page spreads I noted that pull quotes were highlighted either through colour or text size, however I chose to emphasise mine through coloured boxes to show a consistency to my design. The image again within this piece was followed through with a gradient effect added in photoshop, but this was a development to my final drafted outcome as previously I had used a black and white image. I brought through my red line graphic element onto this final piece as a means of emphasising my image and this was something I felt worked well onto the design. Finally by using a drop shadow on the title, I was able to clearly highlight what the article was about and who; something that is regularly used in typical conventions.

Contents Design FINAL


Contents-

Above I have my final contents design. I feel this is my most successful design because of the use of graphic elements such as the red lines and triangles. My research showed me that contents designs are very grid like and this was something that I have developed through my draft outcomes, I have drastically changed the layout of my design since my draft outcome but have still complied to the grid like structure. By using the transparency boxes, I showed consistency in my design and this is something that music products use throughout. The images I have used on my contents design, were carefully selected from a range of photos; I felt that these particular photos portrayed my music magazine genre. Finally I have incorporated red elements on my design to emphasise key areas and this was something i had noted from conventionally use within music magazines.

Front Cover Design FINAL


Front Cover Final-

This is my final front cover design for the music magazine task. I am very happy with how my final piece looks as I believe it fulfils my research and magazine conventions. My image was created via photoshop with layers and gradients to create a warm saturated feel, this was something my research didn't portray and I have challenged pre conceived ideas about music magazine front covers. With regards to my text layout, I have used a bold impact font which stands out against the image. By using a red,black and white triadic colour scheme I was able to challenge pre conceived ideas of red connoting  a rock genre. My cover-lines were emphasised through transparent boxes, this was something my research didn't show and was an idea developed through playing around with Indesign's tools. Mastheads are vital within a music magazine, and having researched all different genre of masthead I decided to use a block colour background to highlight my magazines title. As well as this I used the layering of the same text to apply a slight black outline to the design. My research showed me that a puff and plug is an effective way of attracting a desired audience and by using a polygon shape which was doubled, I was able to create a striking feature that grabbed attention.

Monday, 13 January 2014

Double Page Spread Design Drafted Outcome

Final Design

This is my final design for the making of a double page spread. Overall i feel that this page looks effective and is laid out proportionally. The text itself has fit exact into the column sizes and does not look to squashed on the page, also the image in which i chose to place in black & white works well with the colourings i have used on the page. Finally I have used a drop shadow effect on my title, I think that this gives the singers name a bit more emphasis and makes it stand out against the page.

Double Page Spread Design Draft (2)


Draft 2

This is my second draft to the making of my final design. I have now added another chunk of text into the column structure and I am very happy with how the design is progressing. I feel that once my final column is complete, it will meet the brief requirements. In my next column i would like to add another  pull quote from the text and highlight this in a red feature box.

Double Page Spread Design Draft (1)


Draft 1

This is my first draft for my double page spread. I feel the image i have chosen is suitable for a double page because it takes up the majority of the page, also my model is making direct eye contact with the reader. I have started to add my text, in the column structure provided and so far i am happy with the design set up.